
Halftime comments in blue (mostly from Michai Ramakers)...
Final comments in red...
Rebuttal comments in orange...(and JWL comments...)
John W. Linville
 @JohnWLinville
http://retrotinker.blogspot.com
As the event sponsor, it wouldn't be fair to let me win. But, I see no reason why I can't post about my own project! Think of it as the "pace car" for the race...
Anyway, I've been working on a compiler project for a bit. I'll use that as the subject for some blogging while I try to advance the project during the contest. Hopefully that both sets an example and proves entertaining for others. :-)
John started off with a response to a statement made on a podcast, and explained that the ASL and LSL (Arithmetic and Logical Shift Left) assembly-instructions are really the same thing. He also showed how a pair of 8-bit ROL (ROtate Left) and ASL/LSL instructions can be used to shift a 16-bit number.
Actually, that was essentially unrelated to the stated project. As is all too usual, I've been distracted and really haven't gotten started... :-(
Unfortunately, no more progress from John for this RetroChallenge. I guess hosting the event is in itself retro... and a challenge... Perhaps he can just use that as his next entry? :-)
Failure to launch -- how embarassing!!
Matteo Trevisan (aka Toolkitman) and Tom Porter
 @Toolkitman
https://www.facebook.com/groups/1122836537881786/?ref=br_rs
Buy a NES Raspberry pi kit build it and install a working Operating System running some example real ROM. It seems an easy tasks but there are a lot of steps to move to make this so i hope to entertain you!
My friend Tom Porter wants to collaborate with me in this challenge, we will made a nespi with operative system an Apple II running a jukebox made by Tom with songs and animations.
Matteo apparently continues with the same enthousiasm he showed during RC2018/04, this time with Tom as new team-member. After assembling and booting a NESPi, they combine a music player, calculator, notepad and BASIC-prompt into an all-in-one application, complete with some form of graphical menu. Documentation may feel a bit chaotic at some points, but this entry seems well on its way to complete its goal.
In the same style as the first half, Matteo and Tom continued towards the goal of their Challenge. While attempting to add 3 games to the menu, they conclude that the 3rd one - a text adventure called Fandom Journey - would not fit onto a single disk image without removing music-tracks. While Tom worked on implementing a replacement game ("Kart"), Matteo made an Amiga BASIC MOD player, and a command line BASIC MP3-player. Not sure whether Kart was finished in time, but eventually the team decides on including Fandom Journey anyway, having removed some music to make space. The final version of the graphical menu has 2 stages (main menu and game selection). All in all, they fully reached their goal, and Family Basic for Apple II is a reality. I'm not sure exactly who did what - I have the feeling Matteo focused more on the overall structure and smaller applications/games, and Tom on the bigger applications and games. The blog is perhaps a bit chaotic, but clearly full of enthusiasm. Furthermore, I was "one of those people" without a Facebook account, so I had to use someone elses computer to read this blog. Good team effort.
VintageVolts
 @VintageVolts
http://www.vintagevolts.com/retrochallenge-rc201809/
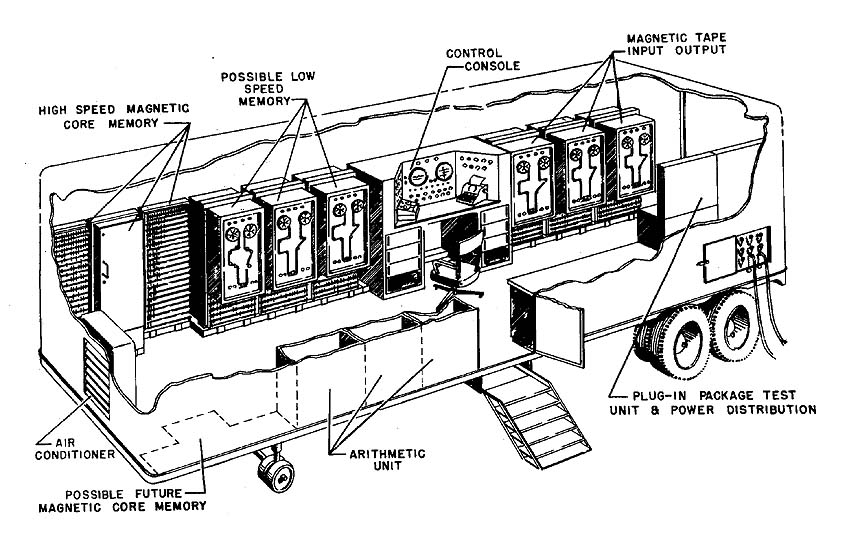
(Continue) creating a working emulation of the MOBIDIC portable computer, developed by Sylvania for the U.S. Army back in the early 1960s. More details are in the introduction on my blog post.
VintageVolts clearly states that his effort will span more than a month, and picks up where he left off, continuing work on a previously completed emulation of the MOBIDIC computer. The bigger picture here is to make a fairly obscure and unknown system accessible to the broader public, and that's a fine goal indeed. Instead of people having to own a trailer-sized system, the focus is moved to emulation, and perhaps eventually building a replica based around that emulation. Basic emulation of the CPU works, so who knows what more we can expect in the 2nd half of this challenge?
Alas, no further progress from VintageVolts, unless I missed some updates. Still, his project hilights an interesting snapshot of computing history, and hopefully he will continue with it. Perhaps next RetroChallenge.
Jason Falkowski
 (Twitter-free)
http://vintagetechramblings.blogspot.com/
For my first RetroChallenge i was wanting to keep it kind of simple since i am new to the vintage computing scene. Here a few a few small projects i would like to complete. In no particular order:
In his first RetroChallenge effort, Jason documents his succesful effort healing an injured PC 8300, and then continues with an Atari 800, fixing its broken keyboard cable and cleaning it up (looks do matter!). Using perfboard, he goes on to make an RPi "hat" using buttons and OLED-display, to make a custom Pi1541 drive. This project seems to proceed quite well, although some programming-challenges are still lurking.
Although Jason was up to a good start and made quite a bit of progress in the first half, progress stopped before all goals had been met: he still has to get his feet wet programming sprites on the C64 or Atari 800 in order to - eventually - write a game. (And what happened to the Atari 800 lid-switch..?) Please note that this is Jason's first RetroChallenge entry ever (a belated welcome to you, Jason :-). Hopefully he'll continue where he left off during the next round. Or with a totally different set of goals altogether?
Seat Safety Switch
 https://cronk.stenoweb.net/@seatsafetyswitch (Mastodon)
https://www.leadedsolder.com/
I am going to try and get a Gotek floppy emulator to work on an NEC PC-8801mkII. If that doesn't work, I will at least make a colour video cable for it and try to make a 5.25" floppy that it can boot from.
Seat Safety Switch uses his first PCB-design ever for a floppy cable adapter for attaching the Gotek floppy emulator to his NEC machine. How many times has this happened to you: apparently make a mistake, then fix the apparent mistake, and then realizing it was not a mistake at all? (In this case: a flipped connector-pinout that turned out not to be flipped at all.) After designing and ordering an improved version of his adapter, focus shifts to fixing the RGB video. Stay tuned!
In an enjoyable to read manner, Seat Safety Switch goes through several revisions (ouch!) of his floppy adapter board, eventually landing on a design that works, and - of equal importance - fits. Sort of. He takes the time to document flashing the Gotek drive's firmware, after which he tries booting his PC98 from it. This succeeds, but only after the 2nd attempt (due to a Gotek firmware initialisation quirk?) Next up: the RGB converter board. It was quite painful to see people being bitten by wrong KiCad component footprints - in this case, a video-connector. The last hurdle was a board mixup between the red and green color channels, which was relatively easy to quickfix, and will probably be solved in the next board revision. Both stated goals were met, and it seems a lot was learned - the hard way - with respect to PCB design. Well done.
 @JohnWLinville
http://retrotinker.blogspot.com
As the event sponsor, it wouldn't be fair to let me win. But, I see no reason why I can't post about my own project! Think of it as the "pace car" for the race...
Anyway, I've been working on a compiler project for a bit. I'll use that as the subject for some blogging while I try to advance the project during the contest. Hopefully that both sets an example and proves entertaining for others. :-)
John started off with a response to a statement made on a podcast, and explained that the ASL and LSL (Arithmetic and Logical Shift Left) assembly-instructions are really the same thing. He also showed how a pair of 8-bit ROL (ROtate Left) and ASL/LSL instructions can be used to shift a 16-bit number.
Actually, that was essentially unrelated to the stated project. As is all too usual, I've been distracted and really haven't gotten started... :-(
Unfortunately, no more progress from John for this RetroChallenge. I guess hosting the event is in itself retro... and a challenge... Perhaps he can just use that as his next entry? :-)
Failure to launch -- how embarassing!!
Matteo Trevisan (aka Toolkitman) and Tom Porter
 @Toolkitman
https://www.facebook.com/groups/1122836537881786/?ref=br_rs
Buy a NES Raspberry pi kit build it and install a working Operating System running some example real ROM. It seems an easy tasks but there are a lot of steps to move to make this so i hope to entertain you!
My friend Tom Porter wants to collaborate with me in this challenge, we will made a nespi with operative system an Apple II running a jukebox made by Tom with songs and animations.
Matteo apparently continues with the same enthousiasm he showed during RC2018/04, this time with Tom as new team-member. After assembling and booting a NESPi, they combine a music player, calculator, notepad and BASIC-prompt into an all-in-one application, complete with some form of graphical menu. Documentation may feel a bit chaotic at some points, but this entry seems well on its way to complete its goal.
In the same style as the first half, Matteo and Tom continued towards the goal of their Challenge. While attempting to add 3 games to the menu, they conclude that the 3rd one - a text adventure called Fandom Journey - would not fit onto a single disk image without removing music-tracks. While Tom worked on implementing a replacement game ("Kart"), Matteo made an Amiga BASIC MOD player, and a command line BASIC MP3-player. Not sure whether Kart was finished in time, but eventually the team decides on including Fandom Journey anyway, having removed some music to make space. The final version of the graphical menu has 2 stages (main menu and game selection). All in all, they fully reached their goal, and Family Basic for Apple II is a reality. I'm not sure exactly who did what - I have the feeling Matteo focused more on the overall structure and smaller applications/games, and Tom on the bigger applications and games. The blog is perhaps a bit chaotic, but clearly full of enthusiasm. Furthermore, I was "one of those people" without a Facebook account, so I had to use someone elses computer to read this blog. Good team effort.
VintageVolts
http://www.vintagevolts.com/retrochallenge-rc201809/
(Continue) creating a working emulation of the MOBIDIC portable computer, developed by Sylvania for the U.S. Army back in the early 1960s. More details are in the introduction on my blog post.
VintageVolts clearly states that his effort will span more than a month, and picks up where he left off, continuing work on a previously completed emulation of the MOBIDIC computer. The bigger picture here is to make a fairly obscure and unknown system accessible to the broader public, and that's a fine goal indeed. Instead of people having to own a trailer-sized system, the focus is moved to emulation, and perhaps eventually building a replica based around that emulation. Basic emulation of the CPU works, so who knows what more we can expect in the 2nd half of this challenge?
Alas, no further progress from VintageVolts, unless I missed some updates. Still, his project hilights an interesting snapshot of computing history, and hopefully he will continue with it. Perhaps next RetroChallenge.
Jason Falkowski
http://vintagetechramblings.blogspot.com/
For my first RetroChallenge i was wanting to keep it kind of simple since i am new to the vintage computing scene. Here a few a few small projects i would like to complete. In no particular order:
- Fix and learn about a PC 8300, ZX81 clone i bought off ebay.
- Make a PI1541 for my C64.
- Start on learning the basics of programming sprites on either an C64 or Atari 800. To slowly start working on a game.
- Try to fix the keyboard and the lid power switch on a Atari 800.
In his first RetroChallenge effort, Jason documents his succesful effort healing an injured PC 8300, and then continues with an Atari 800, fixing its broken keyboard cable and cleaning it up (looks do matter!). Using perfboard, he goes on to make an RPi "hat" using buttons and OLED-display, to make a custom Pi1541 drive. This project seems to proceed quite well, although some programming-challenges are still lurking.
Although Jason was up to a good start and made quite a bit of progress in the first half, progress stopped before all goals had been met: he still has to get his feet wet programming sprites on the C64 or Atari 800 in order to - eventually - write a game. (And what happened to the Atari 800 lid-switch..?) Please note that this is Jason's first RetroChallenge entry ever (a belated welcome to you, Jason :-). Hopefully he'll continue where he left off during the next round. Or with a totally different set of goals altogether?
Seat Safety Switch
https://www.leadedsolder.com/
I am going to try and get a Gotek floppy emulator to work on an NEC PC-8801mkII. If that doesn't work, I will at least make a colour video cable for it and try to make a 5.25" floppy that it can boot from.
Seat Safety Switch uses his first PCB-design ever for a floppy cable adapter for attaching the Gotek floppy emulator to his NEC machine. How many times has this happened to you: apparently make a mistake, then fix the apparent mistake, and then realizing it was not a mistake at all? (In this case: a flipped connector-pinout that turned out not to be flipped at all.) After designing and ordering an improved version of his adapter, focus shifts to fixing the RGB video. Stay tuned!
In an enjoyable to read manner, Seat Safety Switch goes through several revisions (ouch!) of his floppy adapter board, eventually landing on a design that works, and - of equal importance - fits. Sort of. He takes the time to document flashing the Gotek drive's firmware, after which he tries booting his PC98 from it. This succeeds, but only after the 2nd attempt (due to a Gotek firmware initialisation quirk?) Next up: the RGB converter board. It was quite painful to see people being bitten by wrong KiCad component footprints - in this case, a video-connector. The last hurdle was a board mixup between the red and green color channels, which was relatively easy to quickfix, and will probably be solved in the next board revision. Both stated goals were met, and it seems a lot was learned - the hard way - with respect to PCB design. Well done.
Michai Ramakers

http://home.mircad.nl/md/RetroChallenge_2018_09.html
For this RetroChallenge, I would like to make an info-animation or -demo for the HomeComputerMuseum in Helmond, NL.
This is mostly a code-only effort, where a spare Commodore 64 will be showing an informative animation to passers-by. (The museum is located in a street with a fair amount of pedestrian traffic.)
The animation will consist of simple graphical "demo-style" effects with logo, pictures and informative text about the museum.
Let's consider this effort "finished" when there's runnable code on an EPROM/flash/whatever card, ready to be plugged into a Commodore 64. Therefore, making/getting some sort of programmable plug-in card is part of the effort.
Michai aims for a mostly-software, and partly-hardware goal this time. Luckily, the hardware part worked right off the bat. Although there's progress on the overall planning and graphics, the software part of this project has yet to start. (Is there something like an inverted 80/20 rule..?) JWL: Don't forget, Michai also took time to help with comments on everyone's progress!
In the last half of this Challenge, Michai decided on a memory layout for his demo, keeping constraints of an 8 kb cartridge in mind. And, after drawing another retro-bitmap and barely starting on the actual code,...realized September was already over! (The demo/animation will eventually be finished and delivered to the museum as agreed upon, but of course this will no longer count as RC2018/09 effort.) JWL: Many thanks to Michai for his help with the judging, review and comments! I hope his project did not suffer too much as a result!
Mark D. Overholser ( MarkO )

http://www.retrochallenge.markoverholser.com/
To make this a project that actually can be completed in time, I am "attempting" a Multi-Player, Networked Text Adventure, with a Server running on a modern PC, and the Clients being the Apple ][, ( with the Uthernet II Card ) and the Tandy CoCo, ( with a Serial Port and a Lantronix UDS-10/100/1000 ).
I still have not given up on the Idea of Networked CoCos and Apples and C64/C128s and such..
I WILL have something to Demonstrate this Time... I have all my Vitamins Up To Date, ( Seriously, that is very important... ), I have a C64 NIC+ now from go4retro.com and IRATA.ONLINE is becoming a THING!!!!
With quite an ambitious goal, Mark starts off by gathering networking-hardware for Apple II, C64 and CoCo. The server-part of the game will run on a PC, so he reads up on pthread- and socket-programming using C and C++, and makes an example socket-server, which turns out to be tricky. While taking a step back to think about the design of the server-side, Real Life happens, uh-oh... Still only halfway, so anything could happen.
Mark states that his goal was unfortunately not reached: the result so far is a game server, which doesn't work reliably yet. Then again, the goal was... quite huge. Perhaps it would make sense to cut it up into little bits? Hopefully until next time, Mark. JWL: Hey, it's great to see Mark O. make some progress this time -- bravo for perseverance!
Anders Carlsson (zapac)

http://cbm.sfks.se/rc201809.php
Scanning manuals for Commodore PET BASIC extensions + dumping ROMs, and develop a VIC-20 game that utilizes both a 40/80 column cartridge and the built-in 22 column screen at the same time.
Having set 3 very different goals, Anders uses clear documentation to explain the game he plans to make: a Monopoly-like computer assisted boardgame, where the board itself uses 22-column mode, and the 40/80-column display is used for in-game text. Meanwhile, an old scanner is revived by combining it with a more modern OS, allowing for the 1st document in a series of 10 to be scanned, OCR'ed and made into a PDF.
During this second half, Anders worked almost entirely on his game. That meant having to come up with interesting game mechanics as well as the implementation itself. For the programming language, he chose a mix of BASIC and assembly for speed. Progress was made, but the game is not yet finished: a small working framework exists, reorganizing the start of BASIC and setting up the graphics. A proof of concept with 2 screens for respectively graphics and text seems to work. To be continued next time?
Diego Barizo

Instagram: diegobf109
https://diegobarizo.wordpress.com/
- Write a CoCo version of "Hippo Teeth" for Color Basic (https://www.youtube.com/watch?v=KJ5QqZuGn8I)
- Install a full OS and applications in my AcerNote 730 laptop
- Review my old BASIC programs from tapes, find some interesting ones, and try to improve them somewhat to make them faster, more playable, or more useful
Clearly indicating which effort is spent on which of his 3 goals, Diego starts this 2nd half by wrapping up his improved "Aliens" game, and makes the source of old and new versions available. A second game (Russian Roulette) gets an update as well: multiple computer players and sound are added, cosmetic changes are made, and the game mechanics are improved. Sources are now available. A final game (Cup-Caza, or "Super Catch-it") receives attention as well, in the form of multiple adversaries and speed optimizations. As if that wasn't enough, he manages to finish his new "Hippo Teeth" game, adding animations, a welcome screen, music and sounds. However, having multiple goals also means having multiple risks: his plan to reinstall the AcerNote 730 failed, because the laptop in question had become unreliable after all this downtime.
Tom Raidna
Honorable Mention

http://traidna.wordpress.com
Write a program in Kyan Pascal on Apple ][ ( winApple emulator) and Apple ][GS original hardware to interface to a Garmin eTrex Legend GPS using serial connection. This will require USB to serial cable on laptop using USB to serial converter, and serial cable / null modem to DB9 connection on the Apple ][GS. The Garmin Device Interface Specification provides access to :
- Turn off GPS
- Request GPS software version
- Transfer Waypoints, Routes and Tracks
- Turn on / Turn off real time Position Velocity Time data (PVT
- Additionally use of existing Kyan Pascal / Assembly IRQ code for serial connection to the GPS
- Project will be documented at http://traidna.wordpress.com
- Twitter updates will also be used
- Stretch Goal will be to use the winapple emulator version real time on my sailboat using GPS and Laptop thus the link to my picture ;) with YouTube Video
In the last 2 weeks, Tom implemented downloading existing track-data from his GPS to computer, and graphically plotting tracks. Whereas cars rely on fuel only, sailboats rely on wind. Therefore, realtime tracking unfortunately had to be tested during a car trip. However, Tom extended his boat (affectionately named "Apple Pie") with a mounting-panel for his laptop, to use the tracking-software during an actual sail trip. Finally, the software was extended to work with his previous GPS, which supported different waypoint symbols. At the end of his blog, Tom gives a nice summary of which goals were, and which were not reached. For example, the software won't run on an Apple IIGS, because of a Kyan Pascal driver incompatibility on that system. The end result was, nevertheless, satisfactory according to Tom.
Mark Sherman

https://mwsherman.com/rc2018/09/
This time I am finally sitting down and (starting) to write the operating system for the Cat-644.
The Cat-644 is a computer I've been developing around an Atmega 644 microcontroller
- Started in 2013
- Atmega 644, 20Mhz, 4k internal SRAM (possibly upgradable to Atmega 1284 with 16k SRAM)
- 128k bitbanged SRAM: used as VRAM and XRAM
- VGA output, maximum of 64 colors at 512x240, software cycle-counted race-the-beam
- PS/2 keyboard
- RS-232 serial port
- SD Card
- 11 Khz mono 8-bit sound output
- expandable SPI bus: some experiments have been done with SPI-based ethernet shield originally intended for arduino
- It has been 'hardware complete' for a long time, and I have test programs for each piece of hardware, and combinations of hardware. (VGA + sound + keyboard all together was hard)
- The first AVRs were released in 1996, this is just a modernized version of the chip. (Counterpoint: the Intel i9 is just as vintage, as it is just a faster 8086.)
- This is built in the style of 8-bit home computers, with similar limitations: 128k of ram, 64 colors, 20 Mhz. (Emulated 16 mode w/ VGA running os about 250k instructions per second)
- True 8-bit operation. Not like those 'Altairduino' that used a 32-bit Arm.
- Microcontroller has a Harvard architecture and can't run native programs in RAM. User-mode programs will be written in an interpreter emulating a 16-bit processor. (Similar enough to Wozniak's Sweet16?)
- RS-232 communications, PS/2 keyboard, VGA monitor: None of this USB and HDMI rubbish!
- VGA is bitbanged via the microprocessor, only allowing blanking intervals for program operation. Certain operations glitch out the screen. (ZX80-ish)
- One the the first goals for a usermode program is a terminal emulator. This can at least be the dumb terminal for a real vintage computer
- If I don't start working on the OS soon, it will probably become a vintage computer before I finish it. (The hardare only took 5 years!)
- Exceptions will be made for exotica?
After struggling with the combined VGA-and-keyboard driver, Mark succeeds in juggling clockcycles so that both key-input and VGA output work, without having to blank the VGA at all. His blog shows the driver logic as a somewhat unusual flowchart - I'm guessing this puzzle took up quite a bit of time. Mark starts porting part of an earlier SD-card driver, then shifts focus to the bytecode interpreter and overall boot process. A minimal BIOS is made which is able to read/execute raw SD-card sectors, after which it starts a virtual machine. User-programs can then be written against this VM. As a last step, he implements only those system calls necessary for a small "echo" program, thereby demonstrating the complete chain from keyboard input, through the driver model, to the VGA screen. At the end of his blog, he presents a video clip of the system in action. Mission accomplished! (...with a minor note: although SD-card access is shown to work, the "echo" program still runs off the microcontroller's own internal flash.) Will we get to see the first KittyOS game during the next RetroChallenge?
Mats Engstrom
Winner

https://kcsviewer.blogspot.com/
I'll tackle one of the designs that I've only simulated so far - a Kansas City Standard cassette tape decoder/viewer built out of transistors and other discretes. Definitely a ridiculous "just-because-I-can" -project with no real use, but I have a thing for non-IC designs so I'm really looking forward to it.
I've got the simulation/design written up at https://hackaday.io/project/25877-kcs-tape-viewer, but I'm sure there will be a lot of changes during the month so I'll add parts of that into the new blog as time goes by.
One of the few purely electronic projects (although an Arduino is used as audio-source), Mats starts implementing a real version of his KCS cassette tape decoder using only discrete components. FSK demodulation seems to work, nicely demonstrated using oscilloscope traces from different points in the decode-chain. Now that the analog-to-digital part seems to be done, he will move on to implementing the serial to parallel converter.
In this final sprint, Mats implemented a 300 Hz baudrate generator, synchronized to each startbit's edge. Whereas common UARTs sample multiple times within each bit period, he made the choice to sample once per bit, right in the middle, starting 1.5 bits from the start of each frame. Because Mats uses a modular design, it became easy to test each block as it was soldered together and added to the ever growing decoder. For a design that spans the size of a small table, it pays to add a capacitor here and there - which was indeed the solution to a jittery flipflop. The choice to use a ring counter - which was necessary anyway - eliminating a shift register seemed quite clever. With the end of the effort in sight, it was time to get rid of the Arduino as audio-source and go Full-On Retro instead, using an actual tape recorder. Using a 3D-printed 7-segment LED-display, Mats shows the full functionality of the decoder in a video clip. Nicely done. Available soon as a DIY-kit in a store near you..?
Gergő Érdi

https://gergo.erdi.hu/blog/tags/retrochallenge
I've just started two weeks ago to get myself familiar with CLaSH the hardware description language; I plan to use the RetroChallenge occasion to build a complete CHIP-8 computer in CLaSH, targeting the Papilio Pro, a Xilinx Spartan-6 based FPGA development board.
The CHIP-8 was originally a virtual machine spec for RCA 1802-based home computers in the mid-'70s; my implementation would be centered on designing a custom CPU that runs the CHIP-8 opcodes as its native machine code. I'm also going to be implementing my own VGA signal generator and PS/2 keyboard interface in CLaSH.
A few FPGA-related projects this time, and Gergo's CHIP-8 implementation is one of them. Posts are informative, if Haskell-centric (per definition), so it pays off to know Haskell beforehand, which I did not. Apart from progress reports, he adds useful background information about VGA, and how that relates to the CHIP-8's virtual display. At this point, basic PS/2 keyboard input and VGA-generation seem to work, and Gergo will now probably focus on the implementation of the CPU itself, hopefully sidestepping CLaSH bugs...
What seemed to be a CLaSH bug turned out to be a bug in the Xilinx ISE synthesizer itself ... so what now? Gergo chose to sidestep the bug by using the same devtools, but with an older FPGA devboard instead (the Papilio One), and that worked fine after some changes to the CPU-design. As a bit of background information, Gergo (sorry for the missing punctuation BTW) gives an overview of the CHIP-8 VM specifications. The CHIP-8 instruction set is diverse and may appear a bit strange - instructions ranging from low to high level (including random number generator and timer control). The CPU only uses memory mapped I/O. Gergo finished up by restructuring the code to make it more readable, and stating that writing blog-posts took up about half of the total time spent on this project - which is much appreciated. (That said, my own lack of CLaSH / Haskell / HDL skills prevent me from understanding everything he wrote.) This project has reached its goals: the CHIP-8 implementation works and can run games, albeit on another platform than originally planned. Future plans are made to support an actual 4x4 keypad instead of a PS/2 keyboard, a matrix LCD display instead of VGA output, and to use this toolchain for a "real" CPU like the 6502 or Z80... Until next RetroChallenge, Gergo.
Pim van Tend
Winner

https://gitlab.com/pimvantend/metaforth-77/wikis/home
Reviving Observatory Metaforth
Metaforth is a program written in Forth to generate a new Forth-77 system. It is meant to run on an HP 21MX, a computer equivalent to the PDP 11s of its time. The forth system that is generated is a bootable binary for a computer of choice in the HP 2100 series. This binary would be customized for a certain size of memory, version of the instruction set etcetera.
Metaforth was developed at Utrecht Observatory in 1977/1978 by Hans Nieuwenhuijzen and Jan Vermue. My copy of Metaforth takes the form of a printed listing, half an inch thick, that has been lying around for forty years.
My goal is to have Metaforth running in the hp2100 simulator of the simh package and making the original source code available at https://gitlab.com/pimvantend/metaforth-77.
Being a forth program, Metaforth needs a pre-existing forth system to run on. Since I do not have any forth system for use inside the simulator, I want to generate one using an adapted Metaforth running on a present day forth system. I will use gforth as that system.
So my project consists of two stages. One, adapt Metaforth to generate one hp2100 forth binary. And two, run the literal original Metaforth on top of that binary inside simh. At the moment I have done twenty percent of stage one. It would be nice if I could get stage one completed during the month.
Pim's project reads more like a historic text than anything else, showing his interest in Metaforth and its role in astronomy. In this sprint, he focuses on creating a Forth system inside his simulator to run Metaforth in the first place. Pim seems to takes his time to fully digest the source instead of rushing to the end, trying to get an insight into what went on at the time of Metaforth's creation. I guess sometimes the path towards a goal may be as interesting as the goal itself, which seems to apply here.
Continuing on his quest, Pim mentions the UT-200 terminal emulation made by one of the Metaforth creators (Jan Vermue, the other person being Hans Nieuwenhuijzen), and the fact that back in those days, it was quite normal for universities to develop their own tools - software as well as hardware. And that was how Metaforth came to be: generating a Forth system for processing (heterodyning) the infrared light from stars to study starlight. When discussing his efforts on adapting Metaforth itself, it was, for me, challenging to wrap my head around the ancestry in his proposed Metaforth chain, and its implications on the original design of Metaforth. Pim's plan: a modern Gforth running on a PC is used to run a modified Metaforth, generating a Forth image for the HP2100. This generated Forth can then be used to run the unmodified Metaforth ... to generate yet another HP2100 Forth image. Using a clever trick to preset the HP2100 simulator's memory instead of having to juggle binary images, Pim wraps up his Challenge by showing that the first generated HP2100 Forth image indeed runs. However, it still lacks some words/commands to run the unmodified Metaforth - we will hopefully see where this ends a next time. This blog makes for a very enjoyable read, even for someone not into (Meta)forth.
Raphael Assenat
Honorable Mention
https://www.raphnet.net/divers/retro_challenge_2018_09/index_en.php
My project for this edition: Learn everything I can about the NDM24 modem for Super Famicom:
- Find out how the modem communicates with the console through a controller port.
- Learn more about the modem. How fast (or slow) is it? Does it use standard AT commands?
- Attempt to make everything work in an emulator. (Communication with the modem and modem commands?)
- Pretend the connection succeeds to see what happens.
- Attempt to understand the nature of the exchanges between the game and the server.
In other words: I am going to spend several hours working on figuring out how an obscure and (now) mostly useless piece of hardware almost nobody has ever heard of nor cares about works. And I know I'll enjoy it!
Again with a somewhat - or downright very - unusual project, Raphael explains in detail his efforts to revive horse race betting, retro style. This is a project with many possible pitfalls: unknown game code tries to connect to defunct server, speaking unknown protocol to unknown modem. Clear documentation with lots of in-depth information shows how he debugs each problem on the way. Now halfway in, he is trying to emulate the server-side of the dialog, which seems challenging. Update posts are given in a clear and educational way.
Bringing in a logic analyzer for debugging, Raphael looks at what goes on at the electrical level between console and modem, in order to find out why his modem emulation would not work. (Sidenote: I had difficulty understanding what each signal was, exactly.) This allows him to improve emulation to a point where the game actually thinks it's dialing and connecting to a server ... but then stopping immediately. Digging deeper, he figures out how carrier detect was implemented, and adjusts his emulation accordingly: the game now starts to chat with the server - which of course doesn't exist anymore. Making a clean cut (at the client-side of a socket connection to mimic the phone line), he wraps up his efforts, and makes all of his modifications to the emulator available as source. Every goal was met, except figuring out the actual game/server dialogue, which would require reverse-engineering a lot of the actual game. Entries such as these make me realize that no piece of retro history is really safe from the RetroChallenge. :-)
Davy Mitchell
Honorable Mention

http://writingatextadventure.blogspot.com/
In this retro-challenge, I want to create a text adventure (new territory for me) for the Dragon/Tandy/MC10. I also want to try and keep the resources (tools, map, text etc) portable so I can create a version for a unfamiliar system (such as the ZX Spectrum) in the future.
When implementing an adventure game, it's difficult to show progress without giving spoilers. Nevertheless, Davy succeeds in writing an interesting to read summary of his effort this month. First deciding on a map size, he implemented navigation, object inventory, title music, map layout and some puzzles. At this time, the game's storyline itself seems to be more challenging than the code - not sure if he expected that himself...
At the start of the 2nd half, Davy takes a moment to plan the tasks yet to be done. Using an "obtain all items" cheat, he tests the game, improves the interpreter and adds puzzles and locations. Picking a suitable title for the game seems to be a challenge in itself. he goes on to implement item weight, and carefully avoids feature creep now that October is approaching. The last effort goes into bugfixing, adding even more puzzles and sending out test versions of the game for volunteers. He's satisfied with the end result: a game with over 50 locations, lots of items and puzzles and with what he hopes is an entertaining story. Nice.
Cole Johnson
Winner

https://nerdstuffbycole.blogspot.com/
I built a simulation of the General Instruments AY-3-8500 chip from die photos. This was the "brains" behind many PONG-clone video game consoles of the 1st generation. It could play five different versions of PONG, plus TWO shooting games! Retro enough for ya? This September I'm planning on figuring out how most circuits inside this chip works, as well as programming a real-time emulation of it (probably first in JavaScript.)
I post updated versions of the simulation on GitLab <https://gitlab.com/TheProgrammerIncarnate/VisualP0NG/blob/master/AY-3-8500.html>, but my blog is where I talk about it.
This is quite an exciting project, in that Cole literally shows us what goes on inside a "Pong chip", right down to the transistor level. His current effort focuses on figuring out what all subcircuits inside the chip actually do, and he seems to explain this with text and illustrations quite well. Perhaps not intended for the faint of heart or high-level minded, but I'm curious to see where this deep dive will end.
Halfway through, Cole got distracted making a transistor-level simulation of the GI SP0256 chip (a human vocal tract model to implement speech synthesis) ... as I'm sure we all do at some point. A bit of project background: as I understood it, for both the SP0256 and the AY-3-8500, he used homebrew image processing software to convert die-photos to something like a netlist. For the remainder of the Challenge, Cole focused on the scoring system within the available games, and gives an idea of what was possible and what was affordable at the time when the 1st generation of home consoles hit the market: in-game digital scorekeeping was somewhat of a novelty. Finishing up with an explanation of the decoder and generation of digits on the TV screen, he still left me wondering why the digits are not symmetrical... Gamefield generation and score-keeping explained, I'm not sure how much more there is left to dissect. At any rate, he figured out how those two work, and thereby completed his goal. An inspiring project.
Earl Evans

http://www.retrobits.com
I have an FPGA development board, and I would like to get a retro CPU core running on it. There are lots of open source CPU cores, and some open source system on chip implementations based on those cores - hopefully one of them can work!
The board I'm using is a Digilent "Zybo" with a Zynq-7000 FPGA chip. It's a nice board with a powerful chip and good I/O options - let's see if I can turn it into an 70s/80s style computer.
Earl has been interested in FPGAs and programmable digital logic for a long time, and this time attempts to get an 6502 core running on his particular development board. He gives some relevant personal background along the way as well, which proved to be a nice read. Although a "free run" of the CPU core works, actual program execution does not yet work, and he suspects this having to do with RAM- and CPU-timing. In the end, the Internet came to the rescue in the form of a project that was almost exactly what he was trying to do in the first place. But a lot learned in the process, which was part of the fun. Will we see a stretch goal perhaps..?
Earl succeeded in what he planned on doing - getting a 6502 core running on his Zynq-7000 FPGA devboard. In the final half of RC2018/09, he created a 64 kb RAM with preloaded contents, and used the Xilinx debugging-tools to verify that a simple program worked. However, as for his stretch goal, the gap between CPU and actual computer appears to be quite big, and would require implementing at least some memory mapped I/O devices. Well... that's what he did, too, in a way: a mini MMIO-device consisting of 4 LEDs at a fixed address, which worked fine. :-) He learned about FIFOs as a means to cross clock-domains, and is planning to place 2 FIFOs in between the CPU and an UART, effectively giving the CPU generic input- and output MMIO devices. You know where to apply for the next RetroChallenge, Earl!
Jim Gerrie (jgerrie)
http://jimgerrie.blogspot.ca/
Not sure how much I will be able to do, but I am planning on porting a couple of Dragon 32 type-in Basic games to MC-10:
- Swordsman
- Cheese
- Mushroom Invasion
- Convoy
- Crossword
- Busters
- RaceChase
Jim focuses on an Adventure-like game to be implemented in BASIC, and makes a compromise between ideal graphics and what the MC-10 can do. Adding little tweaks and original features one by one, this project seems to be well on its way to completion. The posts include videos of game progress. The text may be a bit hard to follow at times, at least for me.
Starting off by adding in-game instructions, Jim continues with optimizations and making beta-releases for testing. (He seems to take an iterative approach, where there's always a working version available - probably a good idea.) Tweaking the bat-behaviour is one example of finding a balance between what's perfect, and what's possible within the hardware constraints and the timespan of this RetroChallenge. A link to a playable Javascript emulation is given - I tried the game, and it seems to be quite enjoyable. Finally, he makes adversaries (the bat and the dragon) a bit more challenging, and increases differences in personality between dragons, in the spirit of VCS Adventure. The game seems stable enough now, and ready to be played.
Devon Ostendorf
 (Twitter free)
https://devonostendorf.com/category/retrochallenge2018/
I am going to implement version 2 of my 6502 assembly-written, Spy Hunter-inspired, driving game for the Apple ][. Now that I have a working skeleton (built during April's RetroChallenge), I will be improving the game play by enhancing the graphics and adding sound.
Devon states early on that his goal will not be reached - fair enough, no harm done. (...but feel free to change your mind and surprise us at the last moment!)
JWL: Devon says "So I am going to have to withdraw from RetroChallenge 2018/09. By the time the next RC rolls around (March, I think, with the shift to September?), I expect I'll be able to take another swing at v2 of my game."
As stated before, Devon bowed out of this RetroChallenge, and concludes that having a reasonable set of goals and a clear work-breakdown will likely help him during a next event. Sounds ok - I know one person who could also benefit from this both in real life as in the RetroChallenge, namely myself. :-)
Christopher Just
https://coronax.wordpress.com/projects/retrochallenge-2018-09/
It's time for another sprint on my long-running C64 CRPG project. I'm hoping to make some good, solid progress this time out - if my 6502 assembly skills aren't too rusty!
This time, Christopher works on optimizing his game, in particular with respect to the map drawing code. Using one of the C64's CIA chips as performance monitor, his efforts result in a gradual improvement in drawing-speed, sometimes gaining a lot and sometimes only a little. His game is written in C with the CC65 compiler, which needs some massaging and hand-optimized assembly to eventually result in a theoretical 30 or 60 fps framerate. There's no clearly defined goal for Christopher's effort, but it seems he did, or nearly did what he planned to do.
Christopher fell (again?) into the trap of playing modern video games for a bit, but then picks up where he left off, now focusing on his disk image structure. To use and extend existing map data within disk images, he chooses to create a map-writer and -extractor program for the PC-side: a bit of revived existing code will form the basis of a map resource compiler. While getting into the details of manipulating C64 disk images, he talks about the physical layout of C64 disks, and how that relates to map-data for his game. Christopher had set out to work on his game during September, and that's certainly what he did, with quite a bit of progress.
Paul Robson
 @paulscottrobson
https://github.com/paulscottrobson/m8
It's an intermediate level interactive programming language for the Z80 CPU ; Forth designed to fit the processor rather than the other way around.
The project-page shows lots of commits happening recently, but am I missing the blog updates so far..?
That's because it's not there, it's at https://m8code.blogspot.com/
Oops, apparently I missed the blog. To catch up from the start: M8 is one of Rob's languages intended for the Spectrum Next (or any Z80, or any 8- or 16-bit machine for that matter). It's Forth-like, but fits closer to the instruction set of the CPU. Two major differences compared to "normal" Forth, as I understood it, is that M8 makes heavy use of 2 temporary variables instead of only operating on the data stack, and that M8 programs actually use color as semantic elements - like colorForth. In this Challenge, Rob mainly focuses on the interactive editor/compiler running on the target platform, and finished with a working version - although many features could still be added according to himself, e.g. handling wrong user-input. I found the text a bit heavy to read, and missed a bit of context here and there. However, goal reached - well done, Rob.
Rob O'Donnell
@ViewdataUK
OK, I'm going to try and do *something* #viewdata or #teletext related this time. I've learned from past failures now, and won't set myself any particular goals. The challenge part will be to actually document & blog about what I'm doing!!
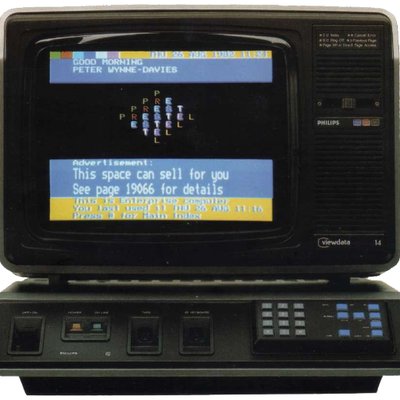
Rob takes a shot at replacing the analog telephony gear around his BBS with modern hardware and software. After trying promising but not quite matching existing software, he decides on writing his own Viewdata host software. He made a page allowing users to upload their own pages to his database, which sounds like a good idea. I found updates a bit difficult to read, because they require some familiarity with Viewdata / Teletext, which I had not.
To illustrate the challenge of Viewdata page storage and retrieval, Rob explains the difference between "instantaneous" and "streamed" pages (e.g. using Teletext on a TV, vs. pulling in a page from a serial terminal). The database format he had been using for quite a while turned out to be insufficiently equiped to store "response frame" pages (form-like pages to be completed by the user, then sent back to the server). This flaw went by unnoticed before, but now that his Viewdata server has progressed enough to be used with an actual Prestel terminal, all response frame pages in the database have to be touched up. Rob comments that the core of the issue is that "everyone did it a little bit differently" back then. (Luckily, this problem no longer applies today. ;-) A few pictures here and there would perhaps have made some concepts more clear, e.g. the encoding and retrieval by clients. Rob explicitly stated a somewhat fuzzy goal for this month, but, admittedly, completed it.
To illustrate the challenge of Viewdata page storage and retrieval, Rob explains the difference between "instantaneous" and "streamed" pages (e.g. using Teletext on a TV, vs. pulling in a page from a serial terminal). The database format he had been using for quite a while turned out to be insufficiently equiped to store "response frame" pages (form-like pages to be completed by the user, then sent back to the server). This flaw went by unnoticed before, but now that his Viewdata server has progressed enough to be used with an actual Prestel terminal, all response frame pages in the database have to be touched up. Rob comments that the core of the issue is that "everyone did it a little bit differently" back then. (Luckily, this problem no longer applies today. ;-) A few pictures here and there would perhaps have made some concepts more clear, e.g. the encoding and retrieval by clients. Rob explicitly stated a somewhat fuzzy goal for this month, but, admittedly, completed it.
Gracana
 @FeatherOrNot
http://www.pnnk.org/rc2018_09.html
For the 2018/09 RetroChallenge, I will be working on an HDL re-implementation (for simulation/emulation and FPGA synthesis) of the John Hopkins University/Applied Physics Laboratory FRISC 3, which is a 32-bit stack processor designed for executing Forth programs in spacecraft control applications. I don't have a satellite to put it in; I just think it's a nice stack computer design to play with, and I like Forth. :)
Some processors were "designed for Win^WForth", and Gracana attempts to make a Verilog implementation for one of these - the FRISC 3. CPU specifications exist, but contain easy-to-miss details. Gracana wrote a hardware-description of the ALU and corresponding testbench, and decides on a clock model (6 clocks per instruction cycle instead of the suggested 2, only using 1 clock phase). The implementation of stack-memory proved to be complex, nevertheless seems to be completed now. I'm not quite sure what to expect as next step, because the updates assume some knowledge of Verilog and FPGA-synthesis to be fully accessible. An interesting project nevertheless.
Too bad, but after the 1st half of this Challenge there were no more updates. Gracana's goal for this month was to work on an HDL implementation of the FRISC 3 processor, which was certainly done. Feel free to continue where you left off during an upcoming RetroChallenge. :-)
Stephen Barriball (z0m8ied0g)
 @z0m8ied0g
http://blog.retroacorn.net/category/201809
Back several years ago I won the Retro Challenge with my ViewData BBS. I want to fully re-write it using .Net Core to provide a more streamlined version with the ability to run on other platforms other than Windows.
Stephen sets a very detailed and ambitious list of goals, but beyond that, sadly didn't show signs of progress yet. Still 2 weeks to go, so anything could happen.
Unfortunately, still no updates, and time's over. Or did I miss the blog..?
http://www.pnnk.org/rc2018_09.html
For the 2018/09 RetroChallenge, I will be working on an HDL re-implementation (for simulation/emulation and FPGA synthesis) of the John Hopkins University/Applied Physics Laboratory FRISC 3, which is a 32-bit stack processor designed for executing Forth programs in spacecraft control applications. I don't have a satellite to put it in; I just think it's a nice stack computer design to play with, and I like Forth. :)
Some processors were "designed for Win^WForth", and Gracana attempts to make a Verilog implementation for one of these - the FRISC 3. CPU specifications exist, but contain easy-to-miss details. Gracana wrote a hardware-description of the ALU and corresponding testbench, and decides on a clock model (6 clocks per instruction cycle instead of the suggested 2, only using 1 clock phase). The implementation of stack-memory proved to be complex, nevertheless seems to be completed now. I'm not quite sure what to expect as next step, because the updates assume some knowledge of Verilog and FPGA-synthesis to be fully accessible. An interesting project nevertheless.
Too bad, but after the 1st half of this Challenge there were no more updates. Gracana's goal for this month was to work on an HDL implementation of the FRISC 3 processor, which was certainly done. Feel free to continue where you left off during an upcoming RetroChallenge. :-)
Stephen Barriball (z0m8ied0g)
http://blog.retroacorn.net/category/201809
Back several years ago I won the Retro Challenge with my ViewData BBS. I want to fully re-write it using .Net Core to provide a more streamlined version with the ability to run on other platforms other than Windows.
Stephen sets a very detailed and ambitious list of goals, but beyond that, sadly didn't show signs of progress yet. Still 2 weeks to go, so anything could happen.
Unfortunately, still no updates, and time's over. Or did I miss the blog..?
Best of Luck To All Competitors!!
That's the list I have for now -- did I miss anyone? :-)
That's the list I have for now -- did I miss anyone? :-)
That's because it's not there, it's at https://m8code.blogspot.com/
ReplyDelete